Wednesday 26 November 2014

Quick and Easy Xmas Garland

This easy project came to me today.  Contrasting textures make it a bit special and add a hint of handmade to the generic Xmas baubles.
What will you need:
2.5mm crochet hook
8 ply yarn any colour of choice
Store bought Xmas baubles of choice.  I used ones that are about 4cm in diameter. You could use any kind of course.
How:
Attach yarn to hook using a slip knot. Do 35 chain stitches with the yarn still attached to the hook put the hook through the hole of the top of the bauble. Do yarn over and bring the yarn back through to the front of the hole, yarn over through 2 threads on the hook to leave 1thread , this is a double crochet. 
So:
35 chain + double crochet to attach + 35 chain+ double crochet to attach + 35 and so on and so on. Do this until you are happy with the length. Once you are finished cut yarn and pull it through the stitch to create a knot.
A good YouTube video for the Chain stitch is


Slip knot on hook

Hook through the hole

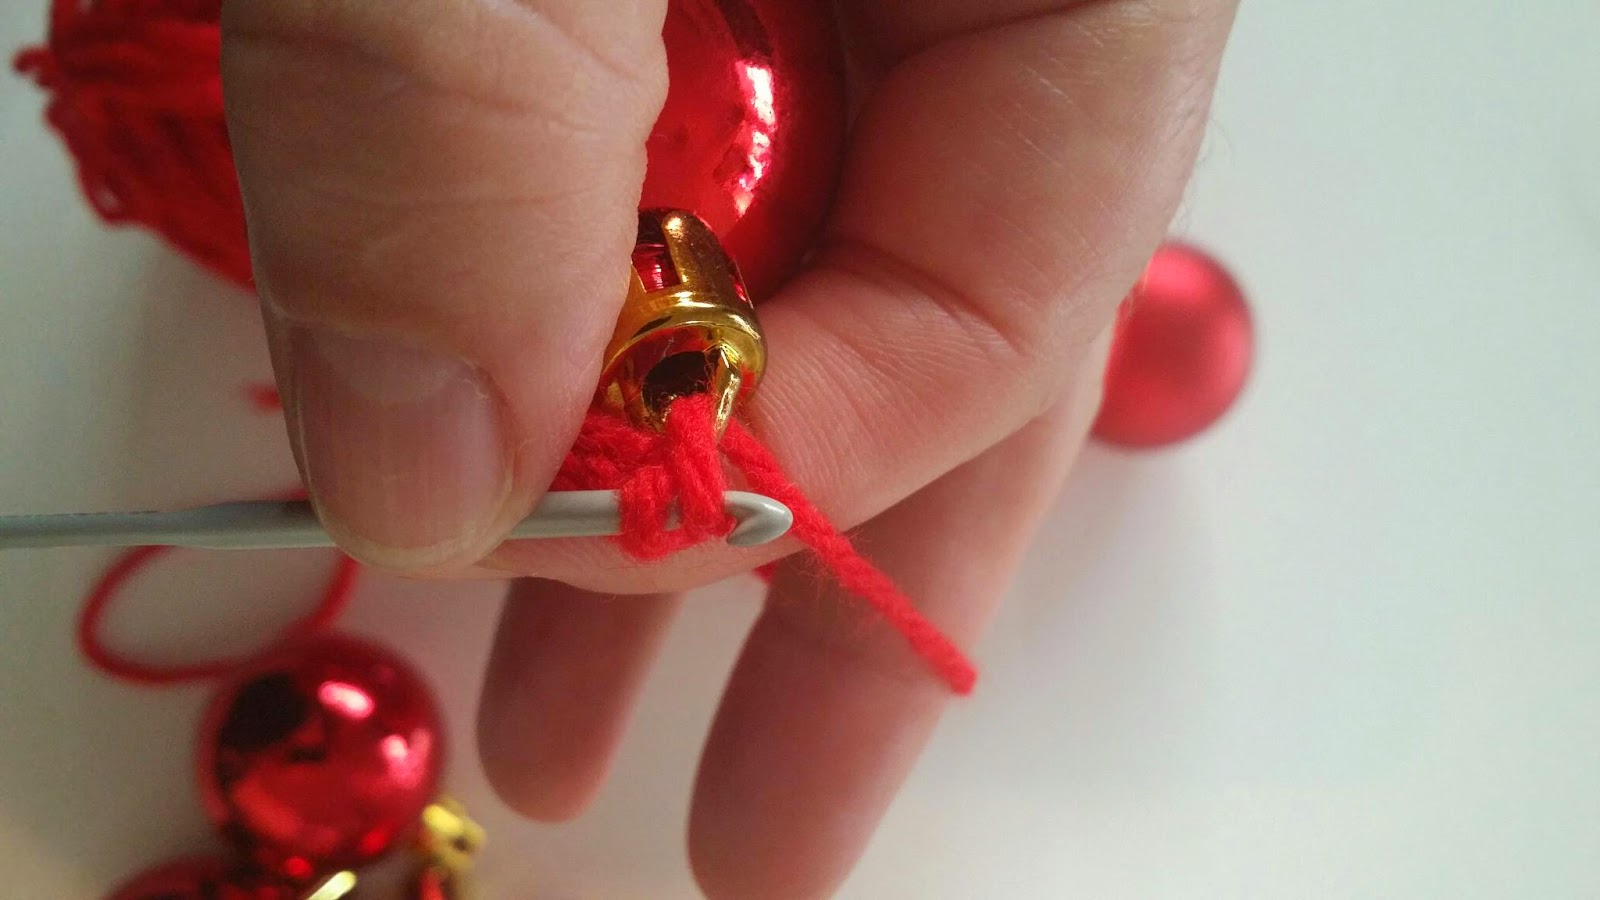
Double Crochet to attach

 Attached bauble


My new garland!

Sunday 9 November 2014

Xmas Decorations

I love Xmas! Look I know its only early November but things in the handmade world are already heating up for Xmas. And what comes first?.......the tree and decorating the house right?
Today I was feeling full of ideas for crocheted decorations that would fit with my up coming workshop and that might sell well in my Etsy online shop.

Thursday 23 October 2014

Arts and Crafts Afternoon

Thanks to my friend Fi I was able to direct the boys to some craft today. It doesn't happen near as much as I would like or should happen.
Fi had sent through cute robot pictures to complete, they were a hit. This progressed to water colour painting and the boys learning how to create colours using primary colours and also some scissor skill work.

Wednesday 22 October 2014

Scrap Buster Bowl


I am a yarn hoarder I can not lie. And I am not alone, I just know it! Projects to help use those left over yarn balls from bygone projects tend to be very useful.
This project is all about colour, don't be afraid. Jump in feet first and combine those colours to your hearts content.
For my Scrap Buster Bowl I used 10ply yarn in lavender, purple and a vivid lime green.
The pattern I used is the crochet bowl pattern that I have previously blogged.
http://daisydaisy17.blogspot.com.au/2014/09/crochet-bowl.html

What you will need.....
3 x 10ply 40gram balls of cotton, wool or acrylic yarn in contrasting colours( the completed bowl weighs 100grams)
9mm crochet hook
The dimensions of the bowl should be 9" in diameter and 3" high

If you want your bowl to be bigger just add as many increasing rounds as you like, following the pattern of increases which is easy to work out.
I completed the bowl with a round of slip stitch to tidy up the top edge.
Weave in ends.

Spray with starch spray to make the bowl more sturdy.


Friday 3 October 2014

My Spring Bag

Its easy at times to forget to make lovely things for my own home and kids. I need a bag for everyday use so I thought I would get busy and hook one up.
The pattern I found is a free one and it is gorgeous. The yarn is just a cotton acrylic blend from Spotlight. I under estimated the number of balls I would need so there is still scope to add some colour to the top section.
Here is the link if you want to make one too


Wednesday 1 October 2014

Peanut Butter Cookies

We made these little biscuits this afternoon. They were very easy and tasty.
The recipe is out of one of my favourite recipe books, The Australian Women's Weekly The Baking Collection

Peanut Butter Cookies

125g butter softened
1/4 cup crunchy peanut butter
3/4 cup light brown sugar
1 egg
1 1/2 cups of plain flour
1/2 tsp bicarbonate of soda

Preheat oven to 180 deg cel.
Line oven trays with baking paper
Beat butter, peanut butter,  sugar and egg in a bowl with an electric mixer until smooth. Stir in sifted flour and soda
Roll tablespoons of mixture in to balls, place on tray 5cm apart and flatten with fork.
Bake for about 12 minutes.
Cool on tray

Free Earflap Beanie Pattern


My fellow Australian crocheters here is a pattern for you! It is using yarn found in your local Spotlight. 

EASY - American Crochet Terms
Size: Newborn – 3mths

Materials:
-  Patons Inca 50g x 1 ball (Colour pictured is Quicksilver)
- 5.5mm crochet hook
- stitch marker
- tapestry needle

Abbreviations

ch - chain
sc - single crochet
sl st - slip stitch
hdc - half double crochet 

Beanie

Chain 4, slip stitch into the first chain to form a ring.

Rnd 1 – ch 2, work 9 hdc into this ring. (Sl st into the 2nd chain at end of each round) 10

Rnd 2 – ch 2, hdc in same spot, 2hdc in next stitches around. 20

Rnd 3 – ch 2, 2hdc in next stitch, (hdc in next stitch, 2hdc in next stitch) repeat () around. 30

Rnd 4 ch 2, hdc in next st, 2hdc in next stitch (hdc in next 2 stitches, 2hdc in next stitch) repeat () around. 40

Rnd 5 – ch 2, hdc in next 8 stitches, 2hdc in next stitch (hdc in next 9 stitches, 2 hdc in next stitch) repeat () around. 44

Rnd 6 to 9 -   ch 2, hdc in each stitch around.

Round 10 – Contrasting colour (White) ch 2, hdc in each stitch around.

Round 11 – Contrasting colour (Navy) ch 2, hdc in each stitch around.

Round 12 – Contrasting colour (White) ch 2, hdc in each stitch around

Round 13  - Attach original colour 2ch, hdc in each stitch around.

Fasten off and weave in all ends.


Earflaps

Fold hat in half with the ch 2 in centre of back of hat.

Count 6 stitches from the back seam to the left with the opening of the beanie facing up. Attach yarn at this point.

Row 1: 1 sc in each of the next 8 sts, ch 1, turn
Row 2: 1 sc in each stitch across, ch1, turn
Row 3: sc2tog, 1 sc in each of the next 4 sts, sc2tog, ch1 turn
Row 4: 1 sc in each st across, ch1, turn
Row 5: sc2tog, 1 sc in each of the next 2 sts, sc2tog, ch 1, turn

To finish keep this yarn attached and sc in each stitch of beanie and earflap. Sew in and trim ends of yarn.


Tassels

Cut 12 lengths of original colour to 90cm in length. Fold lengths in half and thread through the end point of the earflaps. Braid as desired, knot and trim ends.
 

Designed by Toni Huggins, Copyright 2014


Please feel free to sell or donate items created from this pattern. I do ask that you give credit to Daisy Daisy please.